Monday, October 24, 2011

Muffin Tin Pumpkin Monkey Bread


Alright, you guys, my picture does NOT do the recipe/final product justice.

So, just look at the pictures/recipe on the site I got the recipe from! Here it is: http://kirbiecravings.com/2011/10/cinnamon-pumpkin-bubble-buns.html

They were absolutely delicious! They tasted just like donut holes.....mmmm. And they were super simple as well!

I did not like the glaze/frosting though. I would have gone with a cream cheese or a butter cream frosting. You could probably even do a maple frosting on these...the pumpkin is not too noticeable/overwhelming.

Enjoy!

Sunday, October 2, 2011

Banana Cookies with a Neufchatel Cheese/Brown Butter Frosting


I had a few ripe bananas in the freezer, so I decided to make something yummy out of them. I found a recipe for banana cookies here: http://www.dianasdesserts.com/index.cfm/fuseaction/recipes.recipeListing/filter/dianas/recipeID/1894/Recipe.cfm. I altered the recipe a bit. Honestly, it is hard to give amounts because I kind of just add things here and there by sight.

3/4 cup firmly packed brown sugar
6 T butter
2 small ripe bananas, mashed
5 T Neufchatel cheese (2 in cookies, 3 in frosting)
1 teaspoon vanilla extract
1 to 1 and 1/4 cups all-purpose flour
1/2 teaspoon baking powder
1/2 teaspoon baking soda
1/4 teaspoon salt

Combine brown sugar and butter. Add bananas, cheese, and vanilla. Mix. Then add flour, baking powder, baking soda, and salt. Beat until well mixed. I baked them at 350 degrees for around 8 minutes on a cookie sheet. Let stand on cookie sheet for a few minutes until they can easily be lifted off. Frost, and devour!

Frosting:
Brown around 4-5 T butter on the stovetop. In a bowl combine 3 T Neufchatel Cheese with 1/4 cup powdered sugar. Slowly add brown butter and stir until combined. Continue to add powdered sugar to taste.

The dough was soooo yummy, and the frosted cookies even better! Absolutely DELICIOUS!

Also, I knew that Neufchatel Cheese was pretty much the same thing as cream cheese but I was curious as to what the specific differences between the two were, so I looked it up. Apparently Neufchatel was originally created in France. The American version is pretty much the same thing as cream cheese, it just contains less calories/fat. It is also more moist (http://www.tasteofhome.com/Cooking-Tips/Ask-the-Test-Kitchen/Neufchatel-Cheese)! Good to know. :)

Thursday, June 2, 2011

BBQ Chicken Wrap


I absolutely love L and T Salad and Soup! It is one of my favorite places to grab a quite bite. My absolute favorite item on their menu is their BBQ Chicken Wrap...it is lick your finger good..YUM! For the last year I have been making them at home so I can save a few bucks, and although they don't taste exactly the same, they are delicious!

Ingredients:
-Mission Spinach Wrap Tortillas
-romaine lettuce
-sliced cucumber
-cubed tomato
-slices of red onion
-shredded mozzarella and cheddar cheese
-precooked grilled chicken slices
-BBQ sauce (your favorite kind)
-Ken's Ranch Salad Dressing

Recipe:
All of the ingredients for this wrap will be piled on cold. Start with your spinach wrap as your base, and then add some cut up romaine, then the tomatoes, cucumber, onion, cheeses, and chicken. Be careful not to put too much stuff in your wrap, or you won't be able to wrap it up! Then you squirt on some BBQ sauce and ranch. Mix the ingredients together with a spoon and then wrap it up like a burrito! VoilĂ !

Monday, April 18, 2011

Homemade Bagels


Homemade Bagels:

I just LOVE bagels! I have made them before using this recipe (http://www.foodnetwork.com/recipes/emeril-lagasse/homemade-bagels-recipe/index.html) and they turned out awesome! I decided to make them again, and they were delicious. I love making them from scratch because you can make whatever bagels you want. I made cheese/onion bagels and cinnamon raisin bagels this time. Next time I plan on making pizza bagels (covering bagels with pizza sauce and cheese and then popping them in the oven). They take a bit of time, but if you plan it out right you can get stuff done, or have some fun while the dough rises. :)

If you want to add ingredients (raisins, onion, cheese) to your bagels, do it when you add the 4 cups of flour and salt to the yeast.

Friday, March 25, 2011

Colombian style rice with green onions and carrots


I recently went to a Colombian cooking night and learned how to make some awesome dishes. This is a new favorite of mine. I have never made rice this way and I love it!
I contributed my own flair to the recipe and added green onions and carrots into the mix.

Recipe:
1 cup rice (I used medium grain)
3-4 Tbsp oil
2 tsp salt
1-2 minced cloves of garlic
2 green onions, thinly sliced
2 medium carrots, sliced and cooked Al Dente

You can make this recipe in a rice cooker, or in a stock pot. Here are the different versions.

Rice cooker: Add minced garlic, and oil to the bottom of the rice cooker. Add rice, and water. Then add salt and sliced green onions. Stir, and then turn on to cook.

Pot: Add oil to the bottom of the pan, then add minced garlic. Brown garlic. Add the water you will need for your rice. Bring it to a boil and then add your salt. Stir. When it is at a full boil, add your rice and green onions. Turn heat down to simmer. When the rice is almost fully cooked, and most of the water has either been incorporated in the rice or evaporated, cover pot with aluminum foil and then a lid. Turn stove to low and leave for 10 minutes.

Serve with carrots boiled in water til Al Dente.


Comments:
This rice is sooo delicious! I can't get enough of it. And it is easy and fast to prepare too! You can put whatever you want into the pot or rice cooker. I added green onions, but you could put in broccoli, carrots,whatever. I prefer to use the rice cooker because I can just start it and forget it.

Tuesday, March 8, 2011

Bananas!!!!

I have a few random thoughts to share...

1.) I really wanted to make banana muffins but had not planned things too well, and so I only had bananas that were not ripe yet. I figured there must be some way to make them ripen faster. After I did some digging online I decided to follow one piece of advice that kept coming up over and over....put your not ripe bananas in a brown paper bag with apples. I guess the apples give off ethylene gases which make your bananas ripen faster. So when I bought the bananas Saturday morning they looked like this:


I left them in a bag all day long with apples and when I looked at them Saturday night they had totally browned. They looked like this:


So, happy news! I could make my banana muffins. They were sure yummy! They probably would have been even more perfect if I had left the bananas in with the apples for a day longer. Awesome.

2.) I have a new favorite food site. It is called foodgawker.com. Every time I pull it up I just want to cook cook cook because it has such amazing recipes on it. It is sooo amazing, trust me!

Saturday, February 26, 2011

Delicious Salsa!


I am an assistant for a cooking class and we recently made this recipe for one of our meals. It was absolutely delicious!

Recipe:
1 Can black beans, rinsed and drained
1 can corn, drained
2 avocados, chopped
2 green onions, sliced (use white and green)
1-2 Tablespoons chopped cilantro
2 Tomatoes, seeded and chopped
1 package dry Italian salad dressing mix
Ingredients to prepare dressing mix (usually olive oil, vinegar)
Tortilla Chips

Combine first 6 ingredients in a medium bowl. Prepare dressing according to package directions and once made, pour over ingredients. Stir well. Refrigerate. Serve with chips.

Saturday, February 19, 2011

Mozzarella, Garlic, and Basil Bread sticks


I was looking on one of my favorite blogs (http://fortheloveofcooking-recipes.blogspot.com/) today and found a delicious looking recipe. It was for: Parmesan, Roasted Garlic, and Basil Bread sticks. I am a bread LOVER! I decided to try to make this recipe without a Bread Machine, and adapting some of the ingredients. It turned out DELICIOUS!

Recipe:
Bread dough:
1 1/8 cups of warm water
2 tbsp sugar
1 1/2 tsp salt
3 cups of flour
2 tsp active dry yeast

Once risen add:
3 T Mozzarella cheese
2 T fresh (chopped) or dry basil
1 and 1/2 T minced garlic

1 T butter
2 T olive oil

This recipe originally called for dough made in a Bread Machine. I do not own a Bread Machine, so I just made the dough by hand.

First combine salt, yeast, sugar, and water in a bowl. Stir. Let rest 5-10 minutes or until small bubbles form. Then combine yeast mixture with flour in a larger bowl. Knead 5 minutes and form into a ball. Let rise on a heating pad or in a proofing oven until it almost doubles in size. Then, add garlic, basil, and Parmesan cheese. Knead until ingredients are well combined. Separate dough into five inch long snakes about an inch thick. Place on greased cooking sheet (2 T olive oil). Again, let rise on a heating pad or in a proofing oven until double in size. Cook at 375 degrees until golden brown. Brush bread sticks with butter once they come out of the oven.

Comments:
I absolutely loved this recipe because it was so adaptable. I did not have fresh garlic, basil, Parmesan, or a Bread Maker. So, I just made it with what I had. I used minced garlic, Mozzarella, and dry basil and it turned out just great! Also, the cooking times on this recipe may vary. The original recipe says it will take anywhere from 18-22 minutes to cook. In my quick cooking oven, it only took around 9 minutes to fully cook.

Spinach and Romaine salad with cranberries, candied almonds, and Raspberry Vinaigrette Dressing


This is one of my all time favorite green salads. I honestly cannot get enough of it. It is like candy to me! YUM!

Recipe:
Salad:
Romaine lettuce
spinach leaves
cranberries
almonds
Ken's Raspberry Vinaigrette Salad dressing


Combine lettuce, spinach, and cranberries in a large salad bowl. Top with Ken's Raspberry Vinaigrette Salad dressing.

Comments:
I really think Ken's dressing makes the salad! It is my favorite dressing for this salad by far, and I have tried many others.

Strawberries and Creme


Since it is strawberry season, I thought I would tell you all about the amazingness of strawberries and creme. It is an AMAZING combination. It can be the perfect breakfast, or small treat!

Recipe:
1 package creme cheese
1 T vanilla
4 T milk, whipping creme, or Vanilla Silk
2 cups of powdered sugar
1/4 cup butter

Bring cheese and butter to room temperature. Combine all ingredients in a bowl. Beat with hand held mixer until light and fluffy, and the ingredients are well incorporated. Refrigerate until cold. Wash and cut strawberries. Eat!

Comments:
I make this recipe by sight. You can change the ratios of butter, milk, and cream cheese, depending on how you would like your creme to be. I like to use a whole package of creme cheese because I LOVE creme cheese. But, you could use more butter and less creme cheese if you prefer buttercreme frostings.

Cabbage Salad


Cabbage Salad is one of my favorite recipes! It is quick, easy, yummy, and HEALTHY! It is a great way to fit some vitamin rich ingredients into your diet.

Recipe:

Salad:
1 package Dole Coleslaw mix
6 green onions diced
1 package Top Ramen Noodles: Oriental Flavor
7 oz slivered almonds

Dressing:
1/2 t salt
1/4 t pepper
2 T sugar
1/2 cup olive oil
3 T white vinegar
1 packet oriental flavoring (comes with Oriental Top Ramen)

Combine Coleslaw, diced green onions, and slivered almonds in large bowl. Break ramen noodles into small pieces. Add to the contents of the large bowl. Combine dressing ingredients in a separate bowl. Pour over salad. Mix. Cover bowl or put salad in a tupperware for a couple hours in the fridge.

Comments:
If you would like, you can brown your almonds in 1 T. of butter before adding them to your salad. You can also add 2 T of sesame seeds if you would like. I like to put my ramen in a large ziplock bag and then crush it up by pushing/pounding it against the table. This helps to break it up into small pieces. Over time the salad will decrease in size, as the cabbage becomes marinated in the dressing. It will become more flavored and less vinegary after a couple of hours in the fridge.

Saturday, January 22, 2011

Breakfast Quiche


I absolutely love the blog, "For the Love of Cooking". I am always looking to see what new recipes the author posts. This is one recipe that I have tried and love! It is great because it is fast, easy, and you can eat it whenever you want. I originally found this recipe on http://fortheloveofcooking-recipes.blogspot.com/. I have made a few changes/additions to it.

Recipe:
-1-2 potatoes or around 2 cups of frozen hash browns
- cooking spray or vegetable/olive oil
- 1/2 cup of Canadian Bacon, chopped
- 1 tomato, diced or 1/2 of a red bell pepper, diced
- 1 3oz can of green chiles, diced
- 7-8 eggs, beaten
- 1/2 cup of cheddar cheese
- 1/4 cup of milk

Peal, cut and grate potatoes (If you are using hash browns, line a sprayed cooking dish with cooking spray and create a hash brown base around an inch thick). Spray pan with cooking spray or brush with vegetable or olive oil. Place grated potatoes on bottom of pan in order to make a sort of base or crust. Cook potato base in a 375 degree oven for around 10- 15 minutes or until soft. Remove from oven. Put bacon, tomato, green chiles, and cheese on top of base. Mix eggs, milk, and a bit of salt and pepper in a small bowl. Pour egg mixture on top of base. Cook at 375 degrees for 30-35 minutes or until golden brown. Make sure to insert a fork or knife into the quiche to check if it is done.

Comments:
The great thing about this recipe is that you do not have to follow it exactly. If you have some veggies in your fridge that you would like to throw in, go ahead! If you want to put in a bit more cheese, you can. When I make this recipe I usually like to add red bell peppers instead of tomatoes. I also like to use frozen hash browns for the base, just because it means less prep time for me.

Tuesday, January 18, 2011

Knorr Vegetable Dip

I LOVE Knorr Vegetable Dip! It is so delicious! On the back of the package there is a really awesome recipe for a Spinach dip. I was presently suprised when I first tasted the dip. I didn't think I liked spinach dips, and honestly it did not look very appetizing. I was sooo wrong! I gave it a shot and I LOVED it. I have been hooked ever since.

Recipe: 1 (10 ounce) package frozen chopped spinach, thawed and drained
1 (16 ounce) container sour cream
1 cup mayonnaise
1 envelope dry vegetable soup mix
1 (8 ounce) can water chestnuts, drained and chopped

Comments: This is a great party dip! My favorite thing to eat with it is carrots, but you could use any vegetable you want. Chips work well too. It is DELICIOUS!

Sunday, January 9, 2011

Scotcheroos


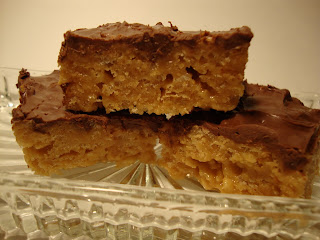
I absolutely love butterscotch! I just find it sooo tasty. This is a classic recipe and is extremely yummy. I found the original recipe at http://ricekrispies.com/#/Default. I altered it a little bit.

Recipe:

1 C light corn syrup
1 C sugar
1 C peanut butter (You can use fatty peanut butter like Jif or Skippy. If you want a healthier version of this recipe try Kroger Natural Creamy Peanut Butter-found at Smith's-it is much healthier and tastes nearly the same!)
5 Cups Rice Krispies® or 6 cups Cocoa Rice Krispies®
1 C semi-sweet chocolate morsels
1 cup butterscotch chips

In a medium saucepan, add corn syrup and sugar. Cook ingredients over medium heat. Stir often, until the sugar has dissolved. Once the mixture begins to boil remove it from the heat. Add the peanut butter, and stir until combined. Add Rice Krispies. Fold Rice Krispies into mixture until the Krispies are well coated. Pour mixture into a cooking spray coated 13x9 pan and press until they are at an even thickness. Leave to the side.

For the top layer of the Scotcheroos melt the chocolate morsels and butterscotch chips in a medium saucepan on low heat. Stir constantly. When chips are melted and combined, pour over cereal mixture. Spread until evenly coated. Leave until hardened.

Cut and serve!

Comments:

The original recipe calls for 6 Cups of Rice Krispies. I like my Scotcheroos to be more chewy and sticky, so I use only five cups. Also, if you want them to have a thicker butterscotch taste, you can change the topping ratio to 1 and 1/4 cup butterscotch and only 3/4 cup chocolate morsels.

HAPPY COOKING!

Chicken Sticky Fingers


I recently had a craving for Winger's Sticky Fingers, but really did not want to fork over the money to buy them. So... I decided to make my own and looked up the recipe online. There were many different versions. The recipe that I like the most was found on therecipeoftheweek.blogspot.com. I was so impressed by it. I am pretty sure if you put it next to the real wingers sticky fingers in a taste line-up, people wouldn't be able to tell the difference. I fed the final product to a group of about twelve people and they went crazy over them...everything was devoured.

Recipe: Winger's Sticky Fingers Sauce

3 T. Franks Original Red Hot Sauce (This is what makes the sauce!)
2 T. Water
3/4 C. Brown Sugar

Put ingredients in a bowl. Mix until combined.

Yes, it is that easy. And it tastes GREAT!

Comments:


The original recipe states that you should heat up the ingredients in a sauce pan. I decided not to do this (just to save time) and it still turned out great. But, I am sure you could heat them up in a saucepan while your chicken cooks.

I used breaded Kroger Chicken Strips for this recipe. They complemented the sauce extremely well.

HAPPY COOKING!